My underseal project

FTO tips and tricks

Moderator: Moderators

My underseal project

Postby Mustang » Thu Aug 26, 2010 10:50 am

After long fingering this job, for ages –due mainly to lack of, time, enthusiasm and access to suitable facilities (due in no small way to the fact that someone was long fingering putting a roof on their garage!) I finally got around to undersealing the FTO. I thought I’d share the experience as there has been some discussion of this subject from time to time on this forum.
As with most paint jobs most of the work is in the preparation.

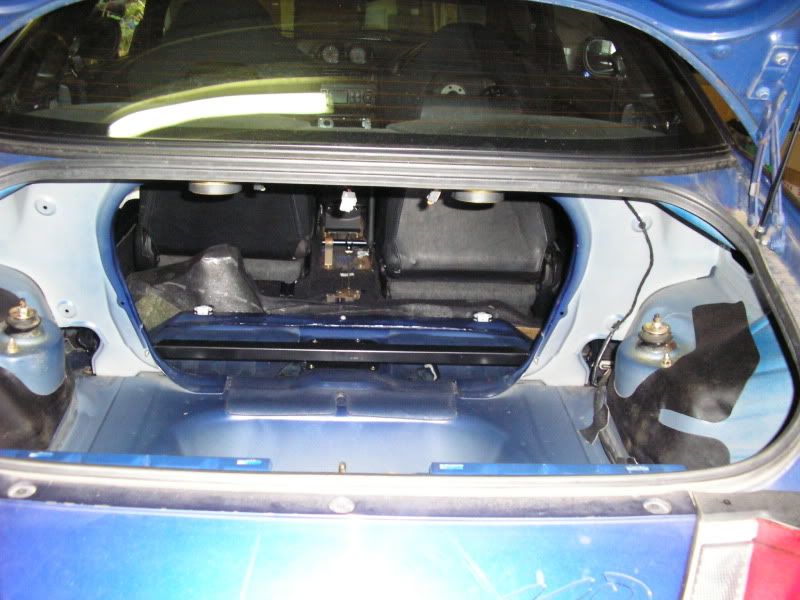
First up I stripped the rear of the interior –boot and rear seats
Image

I then removed the side skirts.

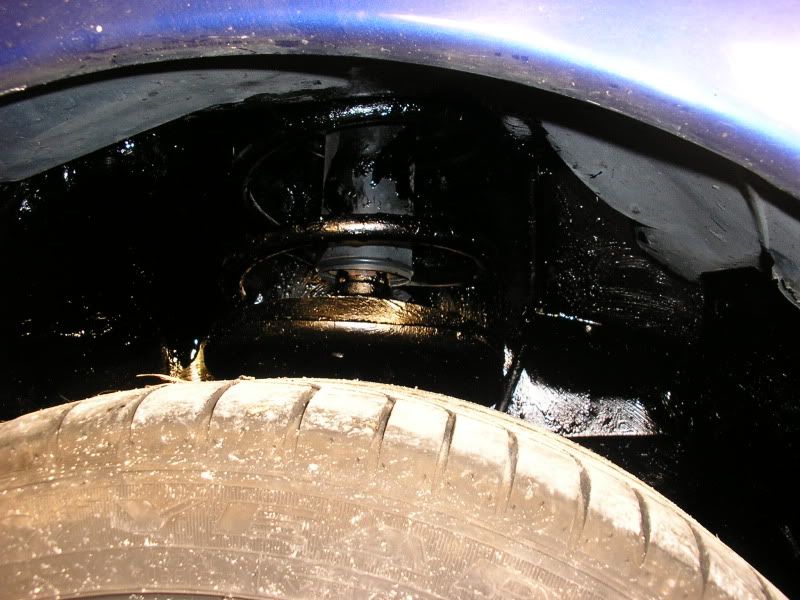
I then removed each road wheel in sequence and power hosed the inside arches and used a scrubbing brush to clean the area, not accessible with the hose –(the ‘lip’just immediately inside the arch)
I also power hosed the underside as best I could with the car on the ground. A very, very high outdoor ramp would be ideal for this –but whose got one of those?

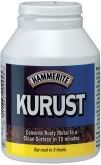
After the car had dried the following day, I removed each wheel in sequence (again), removing as much surface rust as possible with the electric drill and wire brush fittings. Clean off any excess dust using white spirit, then treated the rust patches with Hammerite Kurust –looks like good stuff
Image

Image

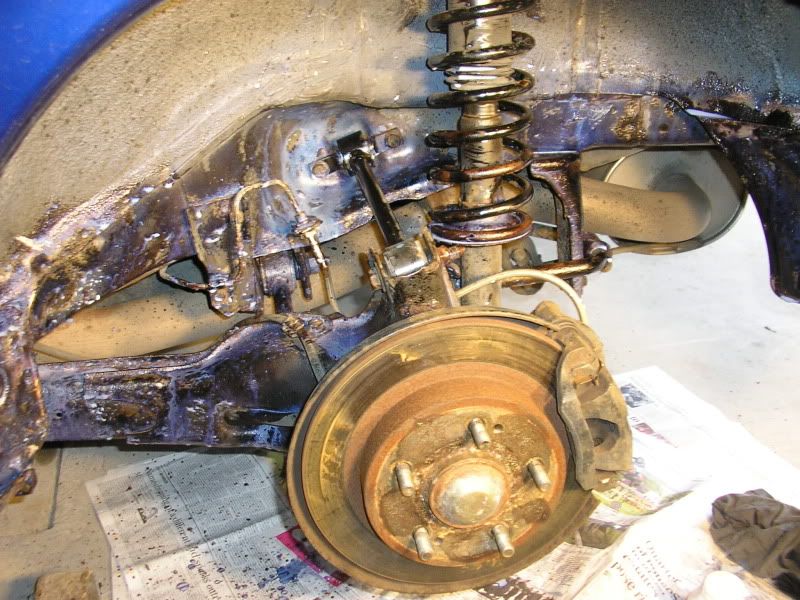
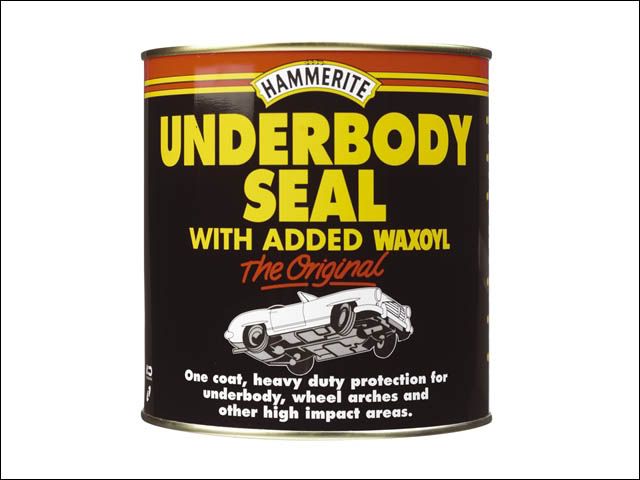
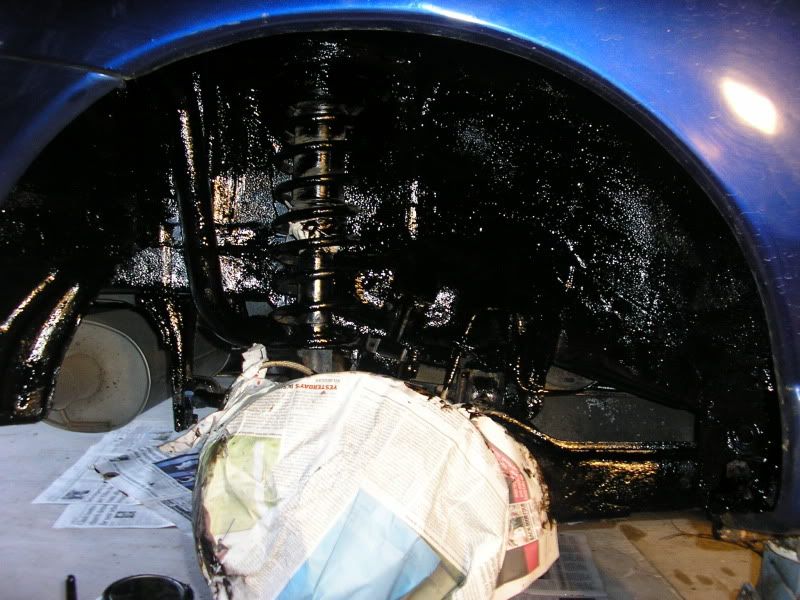
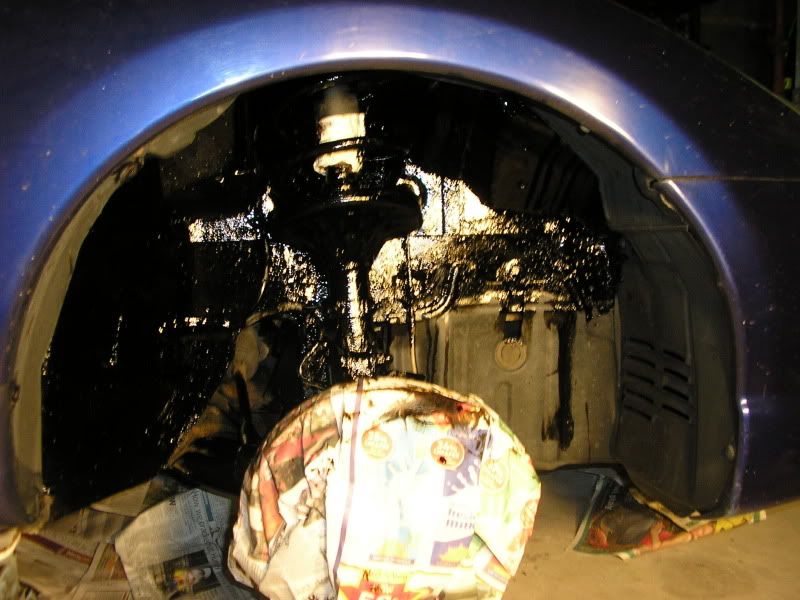
When the Kurust had dried I treated each wheel arch with Hammerite Underbody seal
Image
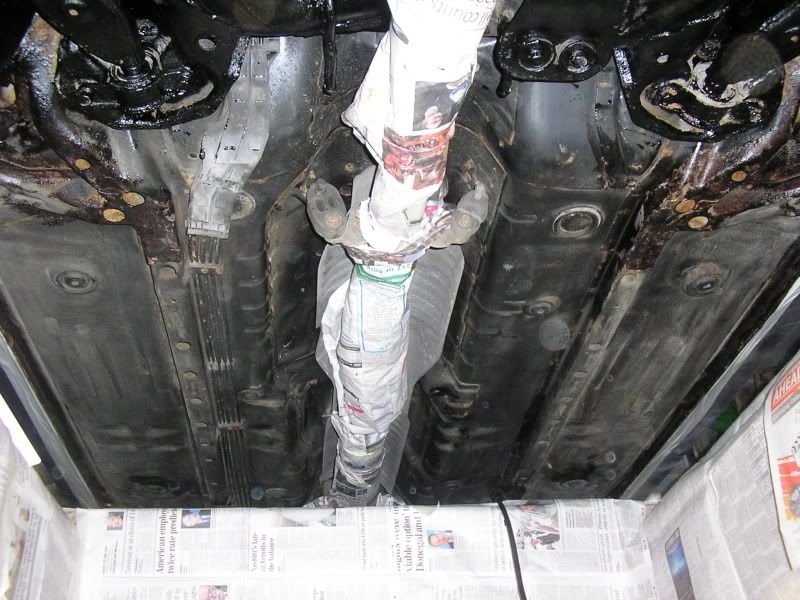
I masked off the brake discs –you don’t want to get waxoyl on your discs
This is painted on and is thicker/ more rubbery than the regular stuff –it’s intended for high impact areas i.e. the wheel arches, that are constantly having grit dirt and water flung at them.
Image
Image
Image
Image

While I was waiting for the Kurust to dry I treated the interior of the door sils
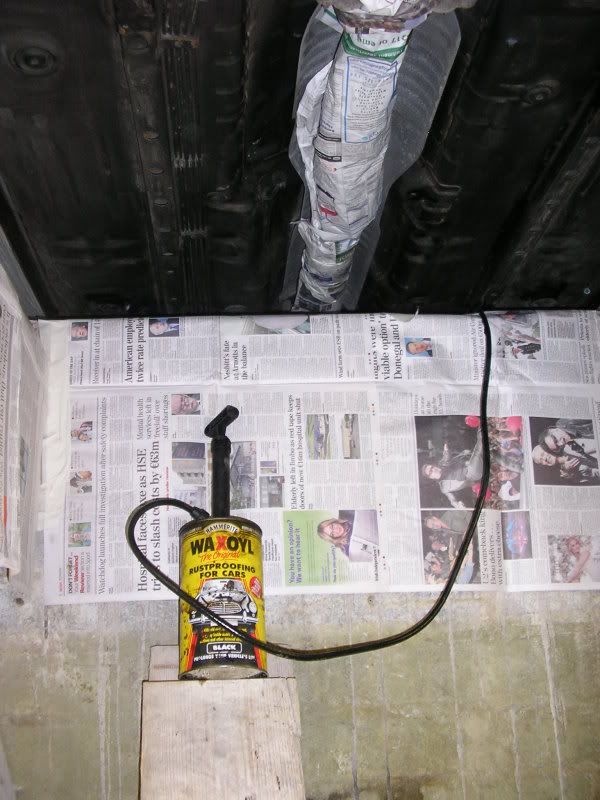
Using the regular spray on waxoyl
Image

Image
Image
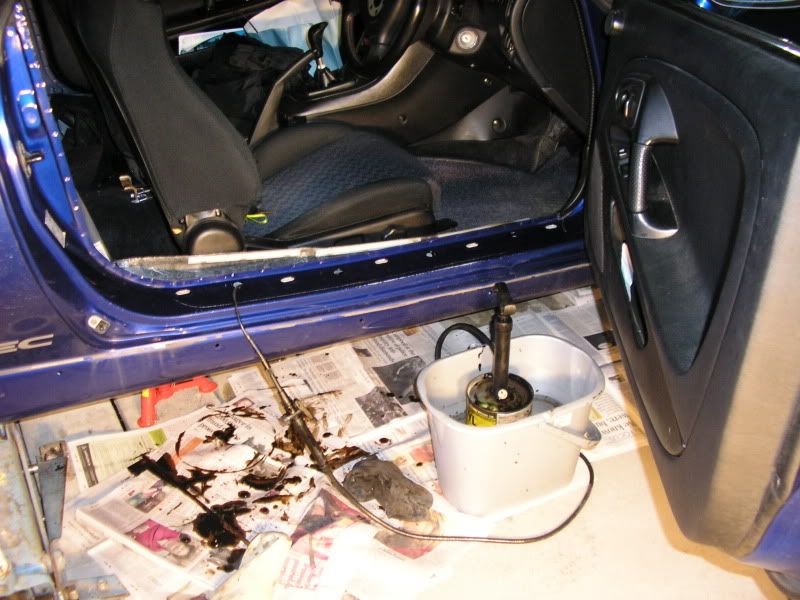
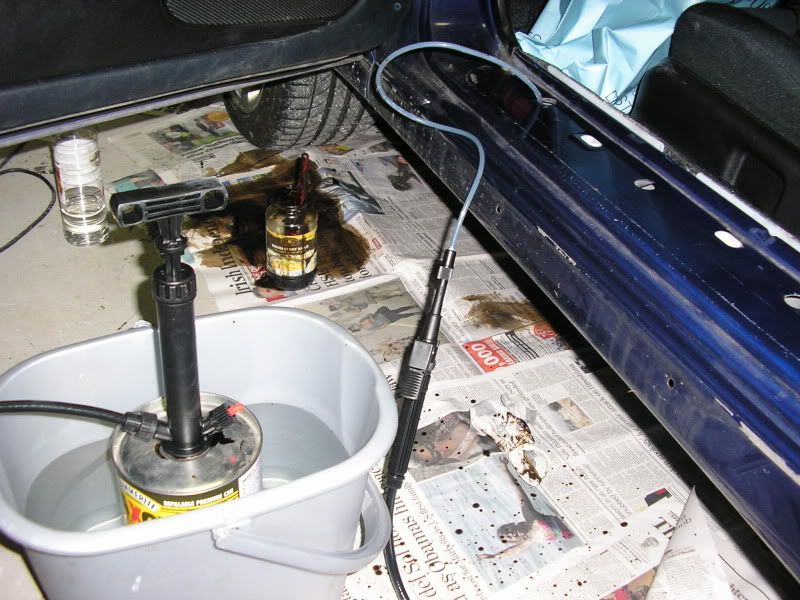
The waxoyl, is mixed with white spirit, and the tin is immersed in hot water -to bring the viscosity down, to facilitate spraying it on.

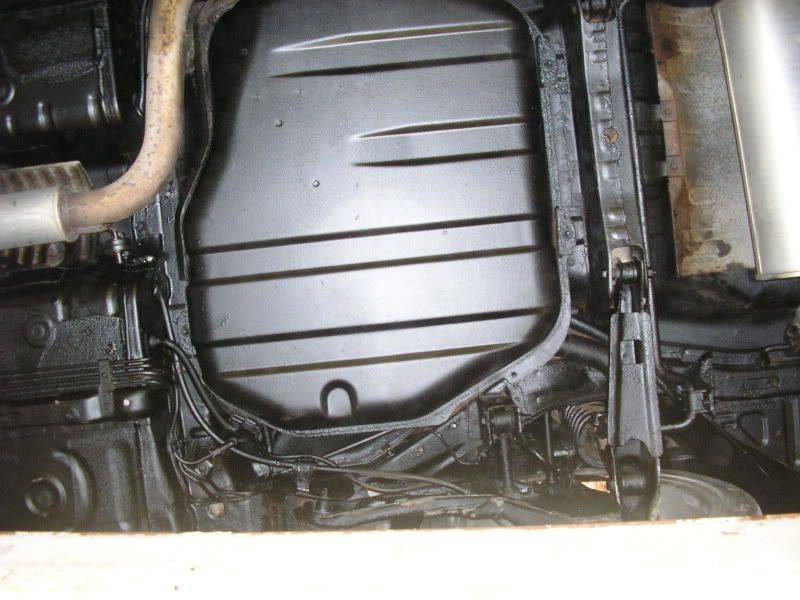
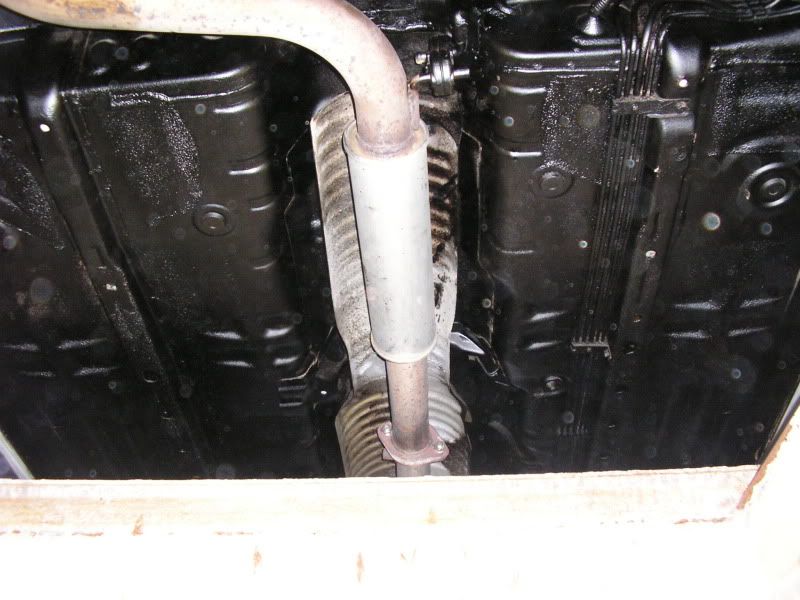
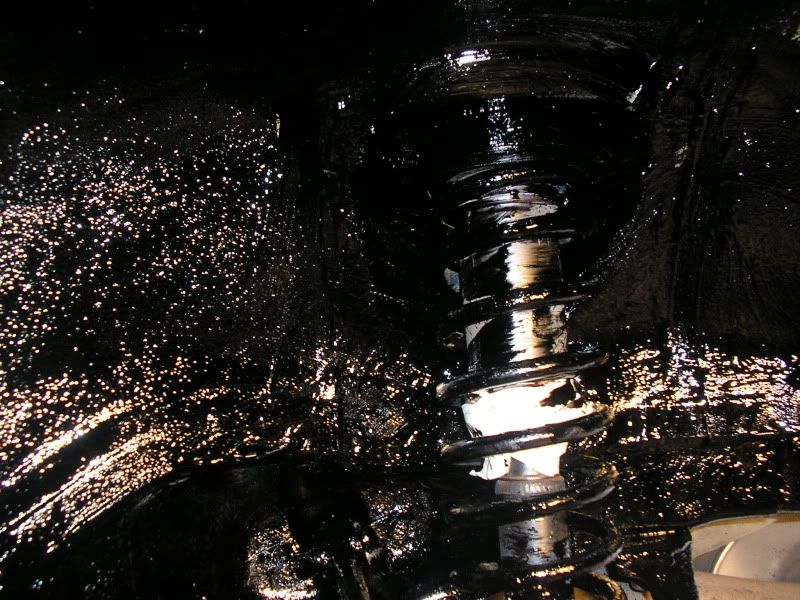
Next up –the underside. Que much manual and drill assisted wire brushing. Scrubbing and then finally a once over with white spirit soaked rags.

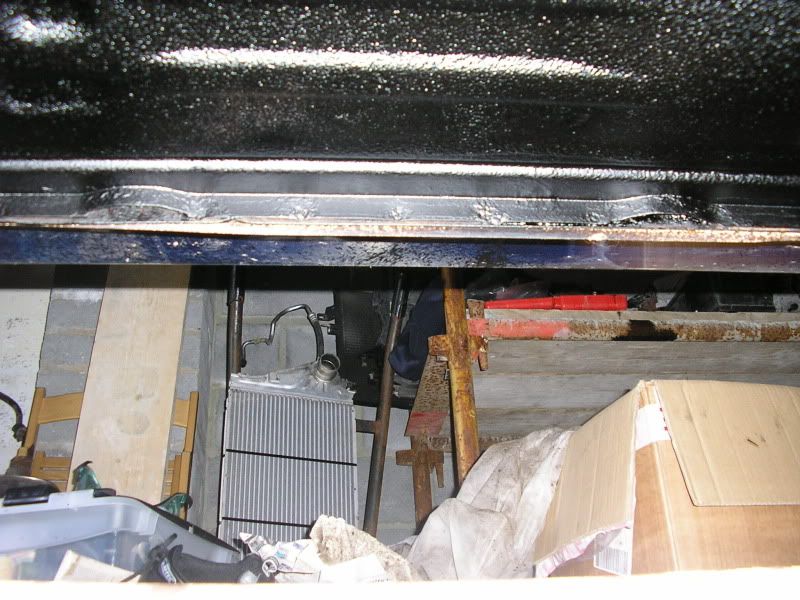
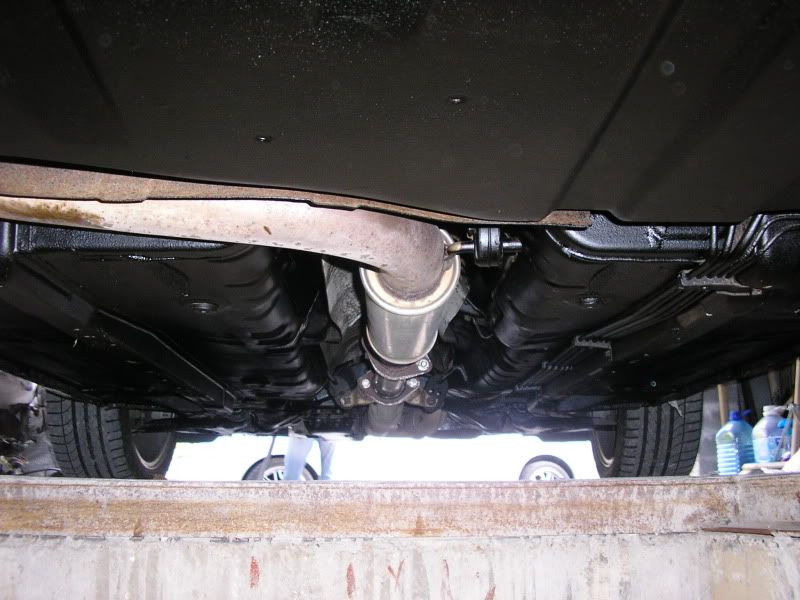
Here the photo is taken from the front looking back –you can see I’ve already started on the Waxoyl treatment near the front –I used the brush on stuff around the engine bay as it is easier to control the application.
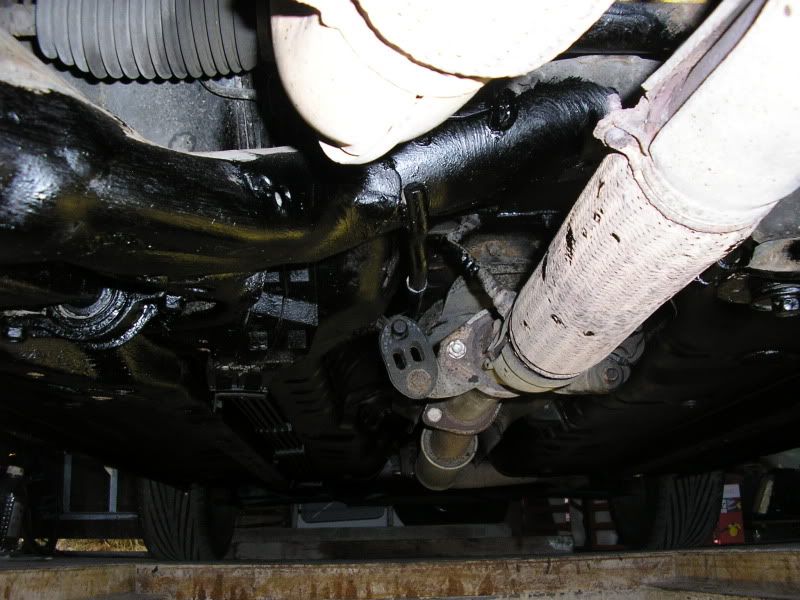
With the Kurust treatment on the front chassis rails as they diverge. Very important to mask off the exhaust –this stuff is flammable.
Image
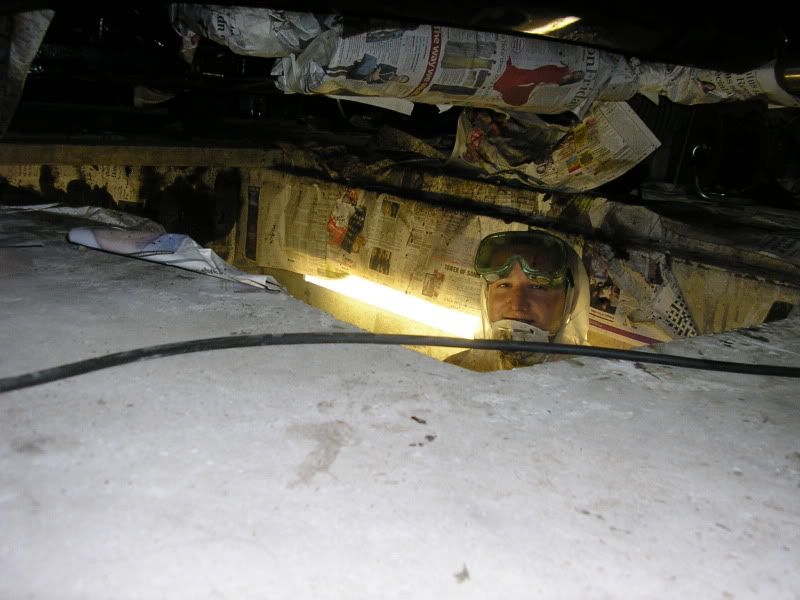
Don’t forget the eye protection whether painting or removing rust–safety glasses at a minimum, or goggles. An eye full of rust, muck, rust treatment or waxoyl just isn’t gonna be nice.

Image

Unfortunately I didn’t get any decent photos of the finished job as it was getting dark and the camera flash was not up to the job. But you get the idea.

This job is the pits!
Image

Disclaimer: I don't work for Hammerite!
Last edited by Mustang on Thu Aug 26, 2010 12:22 pm, edited 2 times in total.
User avatar
Mustang
Forever Ticking Over
 
Posts: 2314
Joined: Tue Apr 27, 2004 10:39 am
Location: Clare / Laois

Re: My underseal project

Postby Sebastian » Thu Aug 26, 2010 11:02 am

TOP JOB man!!!!!!!
no1. manual GR 96 l no2. tip GR 95 l no3. manual Gpx 95 l no.4 manual Gpx 95 l no.5 manual Gpx 96 l no.6 tip GR 95 - in 2011 took a break from the FTO scene
User avatar
Sebastian
Moderator
Moderator
 
Posts: 4862
Joined: Sun Feb 18, 2007 2:09 pm
Location: Citywest , Dublin

Re: My underseal project

Postby Muad_dib77 » Thu Aug 26, 2010 1:37 pm

Fantastic! .. Very envious of your hole in the ground there.....
Image<->FTO-Ireland Shop
Tiomáint sé cosúil go bhfuil tú déanach i gcás maise!
User avatar
Muad_dib77
Moderator
Moderator
 
Posts: 5868
Joined: Fri Aug 26, 2005 3:35 pm
Location: Mr. Adam' back-yard.

Re: My underseal project

Postby escu_calin » Thu Aug 26, 2010 2:55 pm

Muad_dib77 wrote:Fantastic! .. Very envious of your hole in the ground there.....


that hole is a dream....
sick of squeezing under the car for the most minor job

and now please tell
u notice any noise attenuation ?
User avatar
escu_calin
FTO nut!
FTO nut!
 
Posts: 140
Joined: Tue Nov 03, 2009 8:26 am
Location: Cyprus

Re: My underseal project

Postby Mustang » Thu Aug 26, 2010 3:20 pm

escu_calin wrote:
Muad_dib77 wrote:Fantastic! .. Very envious of your hole in the ground there.....


that hole is a dream....
sick of squeezing under the car for the most minor job


Just to clarify. that is not my "hole" :oops: :lol:

escu_calin wrote:and now please tell
u notice any noise attenuation ?

I had been driving the car around with stripped interior for about a week, before starting the job. It really brings home how close your are to the elements. You can hear the grit and water being flung up against the rear arches. Also the sound of the fuel sloshing around in the tank -which also brings home just how close you are to a large amount of flammable material. :shock:

The last picture you see there of me popping my head out from the pit was taken last night, so the car is still drying. I'm collecting it on Saturday, I still need to remove the masking from the exhaust, so hopefully I'll be able to get some photos of the finished product.

I would expect some sound attenuation alright, will report back.
User avatar
Mustang
Forever Ticking Over
 
Posts: 2314
Joined: Tue Apr 27, 2004 10:39 am
Location: Clare / Laois

Re: My underseal project

Postby StewyD32 » Thu Aug 26, 2010 5:17 pm

Very nice job. I want to do the same thing myself.

Just wondering how long it took from start to finish excluding the wash the night before?
User avatar
StewyD32
Full Throttle Owner!
 
Posts: 1218
Joined: Fri Jan 08, 2010 12:07 am
Location: Cork / Dublin

Re: My underseal project

Postby Mustang » Fri Aug 27, 2010 9:47 am

StewyD32 wrote:Very nice job. I want to do the same thing myself.


Correction you want it done -you don't want to do it!
StewyD32 wrote:Just wondering how long it took from start to finish excluding the wash the night before?

I'd suggest about two full, long days minimum.
It took me all day Saturday just to do the four wheel arches, that sounds very long but. Remove one wheel, wire brush the arch (this is time consuming even with a drill) clean, dry, mask, apply rust treatment, allow to dry, apply waxoyl, remove masking, fit wheel. -it would be much quicker if you could get an assistant, so that you could move onto the next arch while he treats the previous one. Also four axle stands, with all four wheels removed would help. I just removed each wheel in sequence, which in a garage environment does not take long. The prep time really depends on how particular you want to be.

The really tricky part is the area around the suspension, there are so many surfaces and 3 dimensional shapes, suspension arms, chassis legs, links, bushes and brackets, all in close proximity that is very hard to prepare.

As I said originally, if you could get the car up on a height (over a meter) outdoors to power hose the underside it would make life much easier.
Failing that -as most people would, I'd suggest using and angled power hose lance
Image
Unfortunately I did not have one of these (my next powerhose will be a Karcher…..)

This would make the initial clean much easier and more thorough. That will get rid of the dirt, but you still need to remove the surface rust –which will still be time consuming.

Having cleaned the arches on Friday, I spent all day Saturday ~11am to ~8pm and got the arches, inner sills and interior done. For the interior I just used the clear waxoyl aerosol
Image
on the inside of the rear wings (accessed from the boot/ rear passenger compartment), along the seams in the boot, top of the shocks and into the cavities on the inside of the boot lid –I plan to remove the rear lights and coat in behind them also.

Sunday. Started at the front of the car –prep, treat for rust and coated, back as far as the front of the rear wheels.

Monday evening. 2-3 hours. Prepared and treated rear of car, and allowed to dry over night.
Tuesday evening 2-3 hours. Some final touches to the preparation and finished the sealing of the rear, and a once over of the main body.
At a push you’d squeeze it into a weekend –definitely if you had assistance.
User avatar
Mustang
Forever Ticking Over
 
Posts: 2314
Joined: Tue Apr 27, 2004 10:39 am
Location: Clare / Laois

Re: My underseal project

Postby Aamir » Fri Aug 27, 2010 10:26 am

Good work man.
I've only got around to doing inside my front doors so far !
User avatar
Aamir
Unleaded
Unleaded
 
Posts: 29
Joined: Wed Jul 21, 2010 10:44 am
Location: Great Britain

Re: My underseal project

Postby Myfeckin FTO » Fri Aug 27, 2010 12:22 pm

Very thorough work - looks like a very messy job though - kudos for doing it yourself.
I'd say it took quite a few baths before you felt clean again ;-)
User avatar
Myfeckin FTO
Forever Ticking Over
 
Posts: 5307
Joined: Wed Apr 28, 2004 2:19 am
Location: Clare/Limerick

Re: My underseal project

Postby StewyD32 » Fri Aug 27, 2010 8:37 pm

[quote="Mustang"]Correction you want it done -you don't want to do it![/quote]

Was that an offer ;P
User avatar
StewyD32
Full Throttle Owner!
 
Posts: 1218
Joined: Fri Jan 08, 2010 12:07 am
Location: Cork / Dublin

Re: My underseal project

Postby Kace » Fri Aug 27, 2010 8:51 pm

[quote="Muad_dib77"]Fantastic! .. Very envious of your hole in the ground there.....[/quote]

We have one of those at home also, that I've never got to use as the oul lad has the bloody thing used as a sand storage pit !! MAD !!
User avatar
Kace
Forever Ticking Over
 
Posts: 2181
Joined: Sat Jul 19, 2003 12:09 am
Location: Near Croak Pork

Re: My underseal project

Postby CJ » Sat Aug 28, 2010 9:59 pm

A very worthwhile job if you intend hanging onto your FTO for a few years, fair play Mustang.

CJ
User avatar
CJ
Site Admin
Site Admin
 
Posts: 9083
Joined: Mon Feb 24, 2003 4:44 pm
Location: Dublin 15

Re: My underseal project

Postby Mustang » Sun Aug 29, 2010 9:16 pm

Having sealed the inside of the door sills –to prevent them rusting from the inside, the last thing you want to do is trap in water. The FTO has 4 or maybe 5 drains at the bottom of the sills on each side. The photo below shows two of them. Once the waxoyl had dried I poked the drains with a small screwdriver, to dislodged any waxoyl that could have been blocking them
Image


And the finished article below
Image
Image
Image
Image
User avatar
Mustang
Forever Ticking Over
 
Posts: 2314
Joined: Tue Apr 27, 2004 10:39 am
Location: Clare / Laois

Re: My underseal project

Postby StewyD32 » Sun Aug 29, 2010 10:26 pm

That looks spotless. Im definitly going to to it.
What the damage to your pocket?
Plus i ain't got a ramp so would I still be able to do it on jacks?
User avatar
StewyD32
Full Throttle Owner!
 
Posts: 1218
Joined: Fri Jan 08, 2010 12:07 am
Location: Cork / Dublin

Re: My underseal project

Postby Mustang » Mon Aug 30, 2010 10:01 am

StewyD32 wrote:That looks spotless. Im definitly going to to it.
What the damage to your pocket?
Plus i ain't got a ramp so would I still be able to do it on jacks?


Just to be clear you should never get under a car that is being supported by a jack only. Jacks are for lifting -not for holding cars up.
I would use an axle stand, and typically leave the jack in place for extra security, It is also a good idea to remove the road wheel and place it under the car. A scratched or wrecked wheel is a small price to pay for saving your life. Just a word of warning axle stands are not the be all and end all of safety, some (especially the cheaper ones), can and do fail. Also if working on an older car where corrossion is a concern, The stand may not fail but there is always the possibility that the chassis/ support point of the car could fail, with the axle stand going through the floor of the car, and the car falling to the ground -be careful.

Without having done it myself it's hard to know, if it could be done with axle stands, and or ramps. I guess it could be, but it would certainly be much more difficult and time consuming, from an access point of view. Do you have a garage? Ideally you would want to at least be applying the waxoyl in a dry environment, and allowing it to dry in a dry environment.

As regards cost, for the undersealing, I bought all of the stuff in halfords -I'm sure it could be acquired elsewhere, possibly for less.
Retail prices as follows:
One 250ml tub of Kurust €10.99
One 2.5l high pressure tin of waxoyl €25.99
One 5l refill tin of waxoyl €39.99
One 1L tin of hammerite underbody seal €10.99
High pressure sprayer €24.49
Extension probe €6.49
One aerosol of clear waxoyl 400ml €10.99

In addition you will need, a couple of wire brushes, a few different sizes, narrow wide etc. A drill, extension lead, lights/torch, several drill wire brush attachments -different sizes. When using the drill be very careful in and around brake lines, and rubber ball jounts, cv boots etc, even a hand held wire brush could easily damage the rubber on these.
Plenty of white spirts, safety glasses/goggles, gloves, paint brushes, scrubing brushes newspapers,masking tape, rags, some empty jam jars, sand paper (very useful for cleaning the neck of the fuel tank which is difficult to access and prone to surface rust), overalls, disposabale overalls, face mask for the spraying process. A bucket to hold the hot water. That's all I can think of for now.

Ideally you'll want your own power hose, if you have one and can get an angled lance for it (like the one above) I highly recommend it. Otherwise I guess a trip to the local filling station power wash is the next best thing.
User avatar
Mustang
Forever Ticking Over
 
Posts: 2314
Joined: Tue Apr 27, 2004 10:39 am
Location: Clare / Laois

Re: My underseal project

Postby Myfeckin FTO » Mon Aug 30, 2010 11:40 am

That looks fupping fantastic Ross.
That underseal job would be a huge plus point if you were ever selling your FTO.
User avatar
Myfeckin FTO
Forever Ticking Over
 
Posts: 5307
Joined: Wed Apr 28, 2004 2:19 am
Location: Clare/Limerick

Re: My underseal project

Postby Mustang » Mon Aug 30, 2010 12:09 pm

Myfeckin FTO wrote:That looks fupping fantastic Ross.

Thanks, I was quite happy with the results, I hope to give the interior of the chassis rails another once over with the extension probe, Just for some extra piece of mind, and the fact that I have a good bit of waxoyl left over. That'll be a simple ~1hr job some saturday morning, as there is no prepwork involved.
The ideal time to do this would be just after importing the car -before the rust and dirt build up. Unforntunately the importation of interesting cars has all but dried up.

Slightly OT. The pit owner runs a JDM '94 MX6, imported via the UK (although never ran on UK roads) about 3 years ago.(actually you can see the MX6 in the last photos). He reliably informs me that there is practically no rust on his car relative to mine (despite being older).


Myfeckin FTO wrote:That underseal job would be a huge plus point if you were ever selling your FTO.

That and the fact it's a rare manual mivec :)
User avatar
Mustang
Forever Ticking Over
 
Posts: 2314
Joined: Tue Apr 27, 2004 10:39 am
Location: Clare / Laois

Re: My underseal project

Postby Sebastian » Mon Aug 30, 2010 6:02 pm

Myfeckin FTO wrote:That underseal job would be a huge plus point if you were ever selling your FTO.

That and the fact it's a rare manual mivec :)


hehehe.

Ross , what do you think .. people would pay more for an FTO that's undersealled ? Or will this increase your car value ? Or is the FTO worth more to you at this stage?

I think this job is to be done if the FTO is a keeper for another 5 years at least
no1. manual GR 96 l no2. tip GR 95 l no3. manual Gpx 95 l no.4 manual Gpx 95 l no.5 manual Gpx 96 l no.6 tip GR 95 - in 2011 took a break from the FTO scene
User avatar
Sebastian
Moderator
Moderator
 
Posts: 4862
Joined: Sun Feb 18, 2007 2:09 pm
Location: Citywest , Dublin

Re: My underseal project

Postby Dragonheart » Mon Aug 30, 2010 9:08 pm

I reckon undersealing would definately be a bonus selling point. Especially if the council start to use salt on the roads in the future, or if the same thing as last year happens and they have to import it from England due to not having enough grit here. Plus it looks class when you look under the car and see it nice and black.
Good job Mustang.
User avatar
Dragonheart
Forever Ticking Over
 
Posts: 3021
Joined: Fri Aug 25, 2006 12:38 pm
Location: Riyadh, Saudi Arabia

Re: My underseal project

Postby Mustang » Tue Aug 31, 2010 8:51 am

Undersealing the car would improve the saleability, not so sure about the value though.
User avatar
Mustang
Forever Ticking Over
 
Posts: 2314
Joined: Tue Apr 27, 2004 10:39 am
Location: Clare / Laois

Re: My underseal project

Postby Muad_dib77 » Sun Sep 19, 2010 9:51 pm

Not sure if they're mentioned here.. but rather than Jack I'd be using those little "service ramps" that they sell in halfrauds..

They kinda look like these..

http://www.discountramps.com/images/aut ... 9000-3.jpg

I've only seen them in Halfrauds but you could prolly pick them up in any motor factors.
Image<->FTO-Ireland Shop
Tiomáint sé cosúil go bhfuil tú déanach i gcás maise!
User avatar
Muad_dib77
Moderator
Moderator
 
Posts: 5868
Joined: Fri Aug 26, 2005 3:35 pm
Location: Mr. Adam' back-yard.

Re: My underseal project

Postby Sebastian » Sun Sep 19, 2010 9:59 pm

they are a bit on a high angle , it makes it difficult to get on them as the bumper would touch them till you get the wheel on ..
You need to use some wedges or a timber ore something to make the slope longer. but I agree , safer than a car jack any any cheap axle stands
no1. manual GR 96 l no2. tip GR 95 l no3. manual Gpx 95 l no.4 manual Gpx 95 l no.5 manual Gpx 96 l no.6 tip GR 95 - in 2011 took a break from the FTO scene
User avatar
Sebastian
Moderator
Moderator
 
Posts: 4862
Joined: Sun Feb 18, 2007 2:09 pm
Location: Citywest , Dublin

Re: My underseal project

Postby Mustang » Mon Sep 20, 2010 9:18 am

Muad_dib77 wrote:Not sure if they're mentioned here.. but rather than Jack I'd be using those little "service ramps" that they sell in halfrauds..

They kinda look like these..

http://www.discountramps.com/images/aut ... 9000-3.jpg

I've only seen them in Halfrauds but you could prolly pick them up in any motor factors.

That website looks like "discount tramps" which would be something else entirely......

I have a set of those type ramps as well not bought in Halfords btw. Specifially the halfords ones, are for a small tire size.
Suitable for tyre sizes:130 x 10" to 185 x 14"
So unsuitable for the majority of cars on the road today.

I agree with Seb the angle is a bit too steep especially for the FTO, so you need a 'step up' timber or whatever before the ramp to raise the car up, to prevent the bumper from hitting the stop on the top of the ramp. TBH this is really annoying as part of the reason for acquiring the ramps on the first place was to ease and simplify the lifting process.
User avatar
Mustang
Forever Ticking Over
 
Posts: 2314
Joined: Tue Apr 27, 2004 10:39 am
Location: Clare / Laois

Re: My underseal project

Postby Muad_dib77 » Mon Sep 20, 2010 2:42 pm

Ah yes... of course these are things to bear in mind if/when making the investment..

it was just posted as a reference picture so peeps could see the type of thing I was on about..
Apparently they come in all shapes and sizes.
Image<->FTO-Ireland Shop
Tiomáint sé cosúil go bhfuil tú déanach i gcás maise!
User avatar
Muad_dib77
Moderator
Moderator
 
Posts: 5868
Joined: Fri Aug 26, 2005 3:35 pm
Location: Mr. Adam' back-yard.

Re: My underseal project

Postby RockShox » Tue May 24, 2011 3:12 am

That is one tough work.
RockShox
1st gear
1st gear
 
Posts: 16
Joined: Fri May 20, 2011 1:32 am

Next

Return to FTO Knowledgebase

Who is online

Users browsing this forum: No registered users and 1 guest