Not a lot to it really. This is how I did it, but of course usual disclaimer, and this is only how I did it, and I'm no expert.
1) Remove lights. 4 nuts each side, pull out, then unscrew bulbs. (Doing them in place would be a bit tricky IMO)
2) Sanding. I sanded down the lettering first, and then gave the whole lot a sanding all over. Started with a 180 grit, and then worked back up to 1200.
3) Clean. Wipe off dust, and then use white spirits or something to remove any grease etc.
4) Tint. Apparently there is a tint for glass which could corrode plastic, so just be careful to get the right one. Spray on in nice even thin layers. You build up the darkness you want, so there's some judgment here. This can be done reasonably quick. The instructions on the can said 1 min between layers, so anything over this is ok.
5) Drying. Once you have a depth of colour you want, give it some time. 4/5 hours min, preferably over night. I brought mine inside after an hour (let the fumes ease some bit) where it was a bit warmer. From what I gather from the tint can, this is now ready to replace on the car. I wanted a tougher finish though.
6) Lacquer. You MUST let the tint dry sufficiently to do this. Otherwise the lacquer will react with the tint, it'll run, and generally make a mess of your lights. Again, build up 2/3 thin layers, but you need to give more time between coats here, maybe 15/30 mins. After the final coat, give it a min of 4hours to set, preferably more.
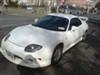
7) Refitting. You're ready to plug back in the bulbs and refit the finished product.
Mine ended up with a slightly matt finish, which looks kinda cool. When I get time again, I plan on giving it a compounding and polish to get a nice gloss finish. Will let you know how that goes.