Peeling \ opaque headlight fix

FTO tips and tricks

Moderator: Moderators

Peeling \ opaque headlight fix

Postby mcgon1979 » Thu Apr 26, 2007 10:30 pm

Decided to do my lights today.... here is the original light. This is actually the 'good one'. The other lamp was twice as scuffed as this....
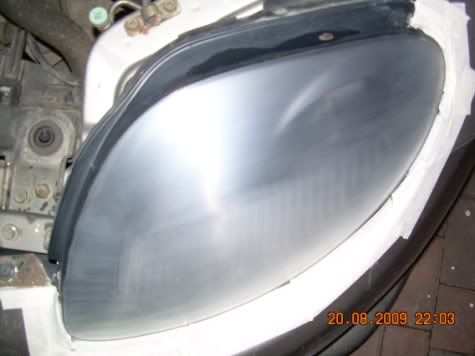
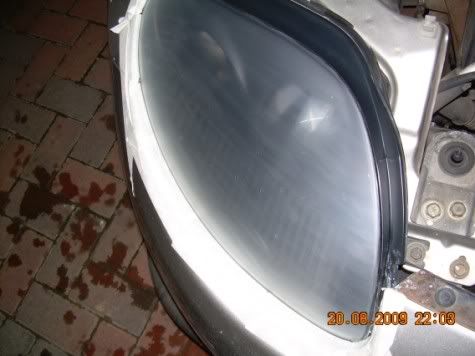
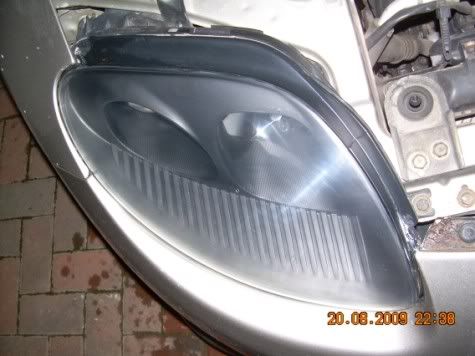
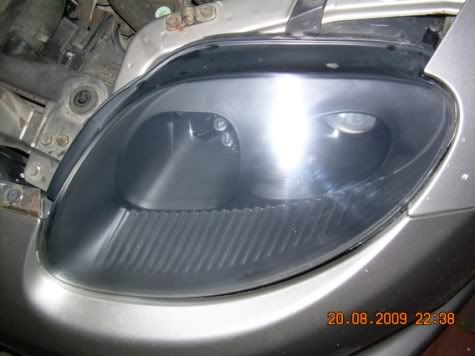
all I used was some simonz cutting compound and ALOT of elbow grease. Certainly not as easy as a simple 5 minute job. Took me about 1 hour per light, but the results were well worth it.

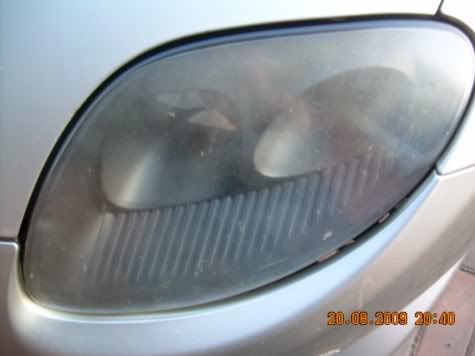
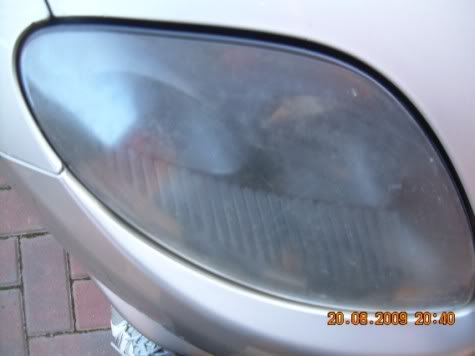
Original Lamp shot detailing scuffing..

Image
User avatar
mcgon1979
Fight The Octopus!
Fight The Octopus!
 
Posts: 1516
Joined: Mon Mar 26, 2007 2:39 pm
Location: Dublin

Postby mcgon1979 » Thu Apr 26, 2007 10:30 pm

applying the cutting compound....

Image
User avatar
mcgon1979
Fight The Octopus!
Fight The Octopus!
 
Posts: 1516
Joined: Mon Mar 26, 2007 2:39 pm
Location: Dublin

Postby mcgon1979 » Thu Apr 26, 2007 10:31 pm

40 minutes of vigerous work later and the lamp is starting to look transparent again...

Image
User avatar
mcgon1979
Fight The Octopus!
Fight The Octopus!
 
Posts: 1516
Joined: Mon Mar 26, 2007 2:39 pm
Location: Dublin

Postby mcgon1979 » Thu Apr 26, 2007 10:33 pm

huge difference when all scuffing is removed...

Image
User avatar
mcgon1979
Fight The Octopus!
Fight The Octopus!
 
Posts: 1516
Joined: Mon Mar 26, 2007 2:39 pm
Location: Dublin

Postby mcgon1979 » Thu Apr 26, 2007 10:34 pm

lights look like new again :)


Image
User avatar
mcgon1979
Fight The Octopus!
Fight The Octopus!
 
Posts: 1516
Joined: Mon Mar 26, 2007 2:39 pm
Location: Dublin

Postby mcgon1979 » Thu Apr 26, 2007 10:35 pm

scuffing 100% gone and lens that look like crystals.... lol 8)

Image
User avatar
mcgon1979
Fight The Octopus!
Fight The Octopus!
 
Posts: 1516
Joined: Mon Mar 26, 2007 2:39 pm
Location: Dublin

Postby mcgon1979 » Thu Apr 26, 2007 10:36 pm

defo give it a go if your lamps are scuffed. you don't need sand paper or buffers etc. just an old t-shirt, a couple of hours, and some good compound... preferably a light one like a liquid... then get working....
User avatar
mcgon1979
Fight The Octopus!
Fight The Octopus!
 
Posts: 1516
Joined: Mon Mar 26, 2007 2:39 pm
Location: Dublin

Postby johnny » Fri Apr 27, 2007 7:33 am

i did mine when I had the fto using wet & dry sandpaper, then cutting compound, then t-cut to finish....each light only took about 15 mins. I can see why urs took so long....using an old tshirt and compound is tough work....the sandpaper sands down the scuffed layer in a couple of mins!
johnny
FTO nut!
FTO nut!
 
Posts: 224
Joined: Tue Nov 22, 2005 2:40 pm
Location: Dublin

Postby Muad_dib77 » Fri Apr 27, 2007 9:21 am

That looks really well! Well done!
Image<->FTO-Ireland Shop
Tiomáint sé cosúil go bhfuil tú déanach i gcás maise!
User avatar
Muad_dib77
Moderator
Moderator
 
Posts: 5868
Joined: Fri Aug 26, 2005 3:35 pm
Location: Mr. Adam' back-yard.

Postby Sebastian » Fri Apr 27, 2007 8:35 pm

congrats
Great JOB ! ! !
wanna do mine as well ? :lol: :lol:
User avatar
Sebastian
Moderator
Moderator
 
Posts: 4862
Joined: Sun Feb 18, 2007 2:09 pm
Location: Citywest , Dublin

Postby steelroe » Fri Apr 27, 2007 10:46 pm

I would suggest to use some very fine car polish after the Compond to give them an evan better finish

Look very well though huge difference
User avatar
steelroe
Forever Ticking Over
 
Posts: 2206
Joined: Fri Feb 28, 2003 3:14 pm
Location: Kerry

Postby ftolam13 » Fri Apr 27, 2007 11:06 pm

nice :lol:
User avatar
ftolam13
FTO is my new religion
 
Posts: 565
Joined: Mon Feb 05, 2007 10:27 am
Location: portloais

Postby Sebastian » Fri Jun 15, 2007 5:55 pm

i used the tips on mine :wink:
no1. manual GR 96 l no2. tip GR 95 l no3. manual Gpx 95 l no.4 manual Gpx 95 l no.5 manual Gpx 96 l no.6 tip GR 95 - in 2011 took a break from the FTO scene
User avatar
Sebastian
Moderator
Moderator
 
Posts: 4862
Joined: Sun Feb 18, 2007 2:09 pm
Location: Citywest , Dublin

Peeling fix on mine

Postby Sebastian » Fri Jun 15, 2007 5:59 pm

after seein mcgon1979 work of art and after reading some bits about it on different forums, i decided to do mine

crap day to do them but i wanted


so :

what i used:


Image

the before pics : driver's side

Image
Image

masking your paint job:

Image

wet&dry sandpaper .. scrub it good
Image
Image

after a few minutes .. start aplying the cutting compound
(dont drop to much)
Image

now elbow power!
i did it for 10 mins/light - clean the lens after

apply T-cut and after that some wax should do

Image


and the result :

Image
Image

did the other side in less then 15 min
Image


Its a huge difference.
but i still think they are not perfect .
i will do them again when i'll have more patience

Q: .. will that peeling come back on the plastic ?
no1. manual GR 96 l no2. tip GR 95 l no3. manual Gpx 95 l no.4 manual Gpx 95 l no.5 manual Gpx 96 l no.6 tip GR 95 - in 2011 took a break from the FTO scene
User avatar
Sebastian
Moderator
Moderator
 
Posts: 4862
Joined: Sun Feb 18, 2007 2:09 pm
Location: Citywest , Dublin

Postby ftolam13 » Fri Jun 15, 2007 10:31 pm

nice :lol: :lol: :lol: :lol: good job man
User avatar
ftolam13
FTO is my new religion
 
Posts: 565
Joined: Mon Feb 05, 2007 10:27 am
Location: portloais

Postby kevinod » Fri Jun 15, 2007 10:44 pm

Nice! I did my drivers side one before and it came back shortly afterwards so I must do it again.
Steel Silver manual GR (95 C)
User avatar
kevinod
Moderator
Moderator
 
Posts: 3336
Joined: Fri Feb 13, 2004 10:57 pm
Location: Cork

sprucing up the head light lens

Postby kona » Thu Aug 20, 2009 11:58 pm

i decided to clean up the head light lens using
sandpaper(3 grades),compound and metallic colour restorer.
they were not really peeling but just very scruffy and weather beaten


before
Image
Image


during
Image
Image


and the final look
Image
Image

there is not much difference in how they looked before and how they looked after a lot of sanding.
it was dark when i had finished so im hoping that they will look better in daylight as the camera flash can be fairly harsh.
[url=http://www.leaksireland.ie/]leak detection[/url ]
User avatar
kona
FTO nut!
FTO nut!
 
Posts: 152
Joined: Sun Mar 06, 2005 12:31 am
Location: dublin

Re: sprucing up the head light lens

Postby Sebastian » Fri Aug 21, 2009 12:14 am

very good !! well done

you can use some Tcut then a bit of wax to give them a final shine
no1. manual GR 96 l no2. tip GR 95 l no3. manual Gpx 95 l no.4 manual Gpx 95 l no.5 manual Gpx 96 l no.6 tip GR 95 - in 2011 took a break from the FTO scene
User avatar
Sebastian
Moderator
Moderator
 
Posts: 4862
Joined: Sun Feb 18, 2007 2:09 pm
Location: Citywest , Dublin

Re: sprucing up the head light lens

Postby kona » Fri Aug 21, 2009 12:22 am

i did use halfords cutting compound and turtle wax metallic colour restorer all ready, but as i never used them before maybe i didnt give it enough drying time or used them too sparingly,
i suppose i could give it some more compund and wax tomorrow without sanding?
[url=http://www.leaksireland.ie/]leak detection[/url ]
User avatar
kona
FTO nut!
FTO nut!
 
Posts: 152
Joined: Sun Mar 06, 2005 12:31 am
Location: dublin

Re: sprucing up the head light lens

Postby Sebastian » Fri Aug 21, 2009 12:28 am

yes , cutting compound and elbow power!!

few examples (BEFORE/AFTER pics-cars from the forum):


Image
Image


Image
Image
Last edited by Sebastian on Fri Aug 21, 2009 12:36 am, edited 2 times in total.
no1. manual GR 96 l no2. tip GR 95 l no3. manual Gpx 95 l no.4 manual Gpx 95 l no.5 manual Gpx 96 l no.6 tip GR 95 - in 2011 took a break from the FTO scene
User avatar
Sebastian
Moderator
Moderator
 
Posts: 4862
Joined: Sun Feb 18, 2007 2:09 pm
Location: Citywest , Dublin

Re: sprucing up the head light lens

Postby kona » Fri Aug 21, 2009 12:31 am

ahh sound job,thanks.
tomorrow ill have a few weetabix and get stuck in with the cutting compound
[url=http://www.leaksireland.ie/]leak detection[/url ]
User avatar
kona
FTO nut!
FTO nut!
 
Posts: 152
Joined: Sun Mar 06, 2005 12:31 am
Location: dublin

Re: sprucing up the head light lens

Postby Sebastian » Fri Aug 21, 2009 12:35 am

sweet! what sandpaper did u use what grade?
no1. manual GR 96 l no2. tip GR 95 l no3. manual Gpx 95 l no.4 manual Gpx 95 l no.5 manual Gpx 96 l no.6 tip GR 95 - in 2011 took a break from the FTO scene
User avatar
Sebastian
Moderator
Moderator
 
Posts: 4862
Joined: Sun Feb 18, 2007 2:09 pm
Location: Citywest , Dublin

Re: sprucing up the head light lens

Postby kona » Fri Aug 21, 2009 12:43 am

it was halfords 800,then 1200 and finally 1500.
they didnt have anything finer than the 1500
[url=http://www.leaksireland.ie/]leak detection[/url ]
User avatar
kona
FTO nut!
FTO nut!
 
Posts: 152
Joined: Sun Mar 06, 2005 12:31 am
Location: dublin

Re: sprucing up the head light lens

Postby Sebastian » Fri Aug 21, 2009 12:46 am

1500 it's ok .. you should have used that all the way if the lights were not badly scuffed.

there is 2k grade but it's hard to find
best of luck
no1. manual GR 96 l no2. tip GR 95 l no3. manual Gpx 95 l no.4 manual Gpx 95 l no.5 manual Gpx 96 l no.6 tip GR 95 - in 2011 took a break from the FTO scene
User avatar
Sebastian
Moderator
Moderator
 
Posts: 4862
Joined: Sun Feb 18, 2007 2:09 pm
Location: Citywest , Dublin

Re: sprucing up the head light lens

Postby kona » Fri Aug 21, 2009 12:49 am

here is a little trick i learnt from my painting days,
it stops the sandpaper from slipping.
instead of folding it in half ,fold it 3 ways like so

Image
[url=http://www.leaksireland.ie/]leak detection[/url ]
User avatar
kona
FTO nut!
FTO nut!
 
Posts: 152
Joined: Sun Mar 06, 2005 12:31 am
Location: dublin

Next

Return to FTO Knowledgebase

Who is online

Users browsing this forum: No registered users and 2 guests