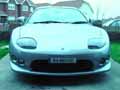
| This
is a rough guide to replacing the pre '97 FTO bumper with a facelift
version and is based on my own experience.
Items
required
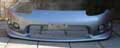
Facelift
bumper (Mitsubishi p/n MR555088)
VW Lupo (’98 on) foglights
MG ZT front indicator units
2 x 581 chromed 120 degree offset pin bulbs (flash orange)
2M of two-core electrical cable
2 x 40mm steel L brackets
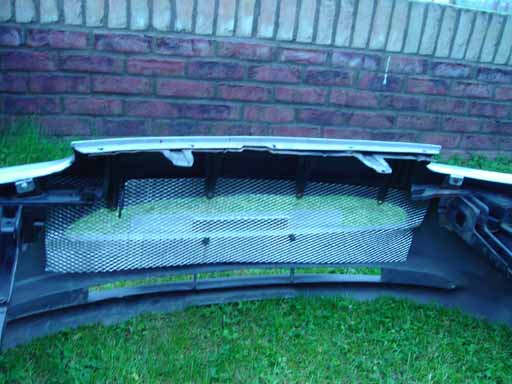
Mesh for bumper opening
8 x female disconnects (mini-spade connectors)
12 x male and female disconnects (spade connectors)
Assorted screws
Tools
required
White
marker pen or similar
Electrical drill
Socket set
Spanner set
Hot glue gun
Screwdrivers
Axel stands
At least 1 pair of hands!
Method
Note:
Firstly, get a copy of Steve Hemmings excellent stainless
mesh installation guide (PDF), it will provide the basis for
the removal and replacement of the front bumper.
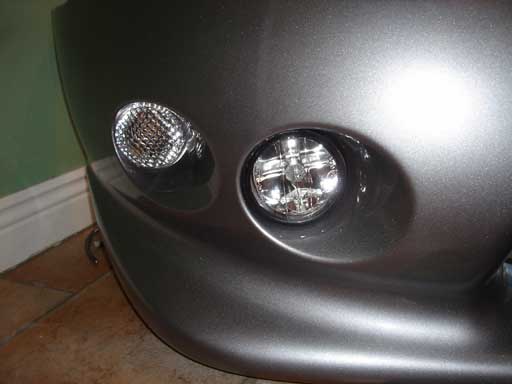
Indicator
unit installation
At
this stage, the front bumper should be fully painted and ready to go,
you will need to take your MG ZT indicators and line them up with the
holes at the rear of the bumper.
Looking towards the front of the bumper, make sure the indicators are
straight and in line with the opening. Using your pen, place marks on
the rear of the indictor unit where it lines up with the two screw
holes in the bumper. Remove the indicator and drill holes where
you’ve marked. Be careful while drilling as too much force
will crack the clear Perspex section of the indictor, I recommend you
drill a pilot hole (2mm) and then follow up with a larger hole (4mm).
The inner screw hole will need to be built up by approx. 15mm; I used a
large rawl-plug and cut it down to size. At this stage you can then
screw the indicators to the bumper using 4mm screws.
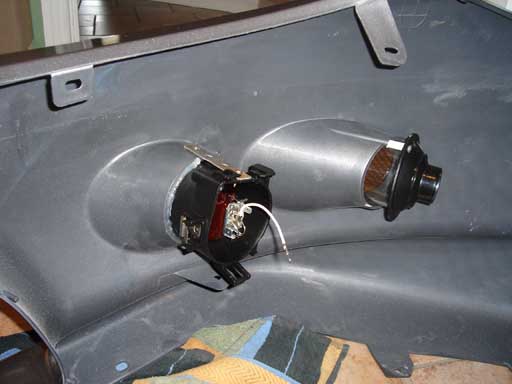
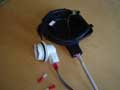
Foglight
unit installation
Again,
place the foglight in the inner bumper hole and line it up at the front
to your satisfaction, take an L-bracket and beat it down flat with a
hammer (alternatively, you can use a piece of mind steel and drill it
with two holes as required). Line up the bracket on top of the foglight
at the rear and mark a spot on the bumper and the light unit at the
bracket holes. Remove the light and drill holes (2mm) in the bumper and
light unit.
Use a suitable screw to secure the bracket to the foglight (not too
long or it will come into contact with the inner part of the light) and
a short (7mm) screw for the bumper. Now that the light unit is fixed to
the bumper, use a hot glue gun and stick the units in place, put glue
around the full circumference of the foglight to ensure a solid bond.
Leave for 10mins to set.
Wiring
I
used mini-spade adaptors which will fit over the connectors on both the
foglight and indicator units, once crimped to the cable and in place, I
used a small amount of glue from the hot glue gun to fill the connector
holes, be careful at this stage as too much glue will melt the
surrounding plastic. Once this is completed, the bumper is ready to fit
to the car.
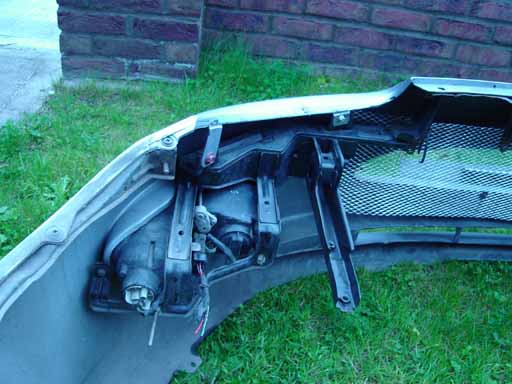
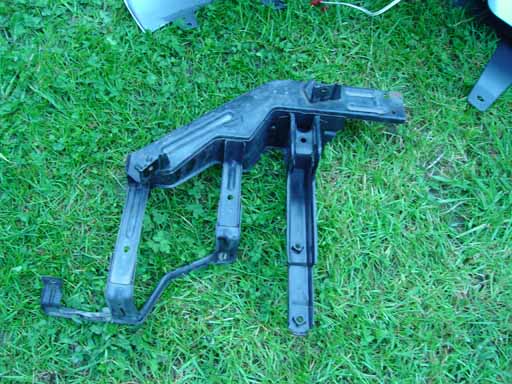
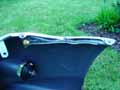
Removal
of existing bumper
Refer
to Steve Hemmings stainless
mesh installation guide
for bumper removal instructions. Once the bumper is off, you will need
to remove the three main brackets, the lower side brackets are held in
place by 3 screws/bolts, before moving these, unscrew the sidelights
from the front of the bumper. The centre bracket is screwed to the
bumper, remove all four screws, you may also want to unscrew it from
the side brackets for ease of installation. There are also two small
brackets at the upper right and left hand edges of the bumper, remove
these also.
Installation
of new bumper
Fitting the old
brackets onto the new bumper is the reverse of the above procedure.
Note the lower screw on each side bracket can’t be put in
place due to the lack of a screw hole, this is not a major problem as
the bumper will be quite secure once fitted. As the opening on the
facelift bumper is different to the pre-facelift, the centre bracket
cannot be screwed to the bumper, as long as it’s secured to
each side bracket, this is enough to keep it in place.
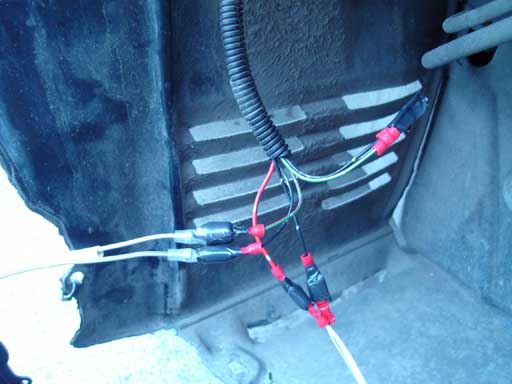
The remainder of the
wiring is required at this point, bring the bumper alongside the front
of the car, you will need to cut the wiring that was connected into the
sidelights. As a reference point, strip back the black plastic on the
wiring and take note of the colour of each wire. Black is earth (there
are 3 of each), red is the foglight live, green-red is the indictor
live and green-yellow is the parking light live (Note: this colour
scheme may differ between cars, to be on the safe side, line the
sidelight connector up with the connector on the loom and trace the
wires to verify).
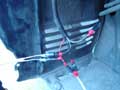
I used crimped spade
connectors to each side of the wiring and used electrical tape to
secure the connections in place. The parking light was not needed in
this case so I taped the cables up for installation of suitable parking
lights in the future. Once all of the cabling is in place, test the
foglights and indicators to ensure they operate.
Before fixing the
bumper back onto the car, install the new mesh onto the rear of the
opening, you can reuse some of the screws from the old bumper (I held
off on this procedure as I didn’t have the mesh at the time,
it can be retro-fitted with the bumper in place at a later date if
required).
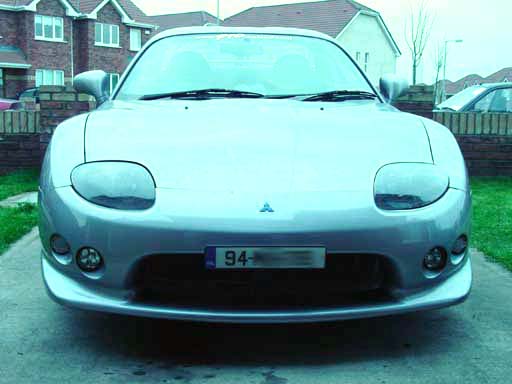
The bumper can now be
fitted onto the car in the reverse sequence to the way in which it was
removed. I would recommend having a second person on hand at this stage
to ensure both sides of the bumper line up properly. Lastly, remove the
Mitsubishi emblem from the old bumper and use double-sided 3M adhesive
or similar to fix it in place on the new bumper. Screw your license
plate in place and stand back and admire your hard work :)
Afternote: I will add
a section for installation of sidelights once I have them in place,
I’m planning to use 82mm halo / angel eyes lights and glue
them onto the front of the foglights, watch this space.
Credits: Steve
Hemming of www.mitsubishi-fto.org and www.type-f.co.uk
fame for use of his Woven Stainless Steel Grill installation guide.
Disclaimer: The author takes no responsibility for
any damages incurred, this a guide only, please take care when
undertaking any work on your FTO, if in doubt, consult a professional.
|